How to Do Rack Pulls for a Stronger Posterior Chain
One of the most basic exercises in existence is the deadlift. At face value, it’s as simple as the popular Planet Fitness joke says—you pick it up and put it down. Sure, just about anyone can work up to gaining brute strength with this compound exercise, but actually mastering it is a totally different story. That’s where variations like Romanian deadlifts and rack pulls come into play—they can not only help you gain mass and strength, but also improve technique. Here we’re focusing on the rack pull exercise.
There are several ways to perform a deadlift, including sumo (wide stance), mixed grip, and single leg. But rack pulls are our favorite for those just starting out.
The rack pull exercise helps beginners learn the ropes of deadlifting and advanced lifters break sticking points to pull more weight. It can also help you build muscle as an added bonus. If you’re anywhere near a squat rack, a barbell, and some plates, then set up and get ready to lift.
What Is a Rack Pull?
To put it simply, the rack pull is considered a half-deadlift. It’s usually performed in a squat rack with the barbell resting on the safety arms so it’s elevated. The intention is to start with the barbell around knee level and perform the lift as if you’re locking out at the top of a deadlift.
When it comes to the rack pull vs deadlift, rack pulls are a great way to get stronger at the top half of the deadlift, a common sticking point for beginners and master deadlifters alike. Because the safety racks are in place, you can lift much more than you would have been able to if you were picking the weight up off the ground. It can also be used as an exercise to strengthen and develop the lower back, as well as the forearms and grip.
The barbell rack pull is an exercise that beginners can learn and advanced athletes can still count on to help see improvement. When done the right way, it can build muscle (6 to 10 reps with moderate to heavy weight) or strength (1 to 5 reps with very heavy weight); with proper form, it’s a very safe exercise. Don’t be afraid to plug it into a back routine or as part of a push, pull, leg workout program.
Related: 50 Best Chest Exercises for 2024
How to Do a Rack Pull
The Setup
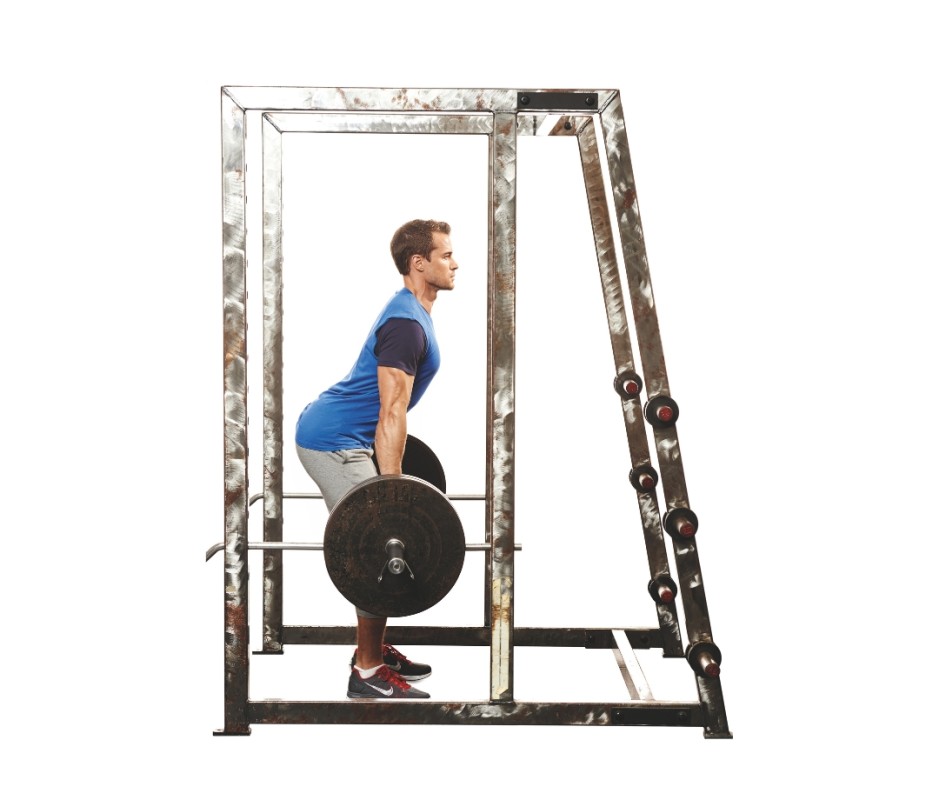
The safety arms of the squat rack should be set around knee height. This can be slightly above the knee if you’re using it to improve your lockout on the deadlift or below the knee to lengthen the range of motion for muscle tension. A general guideline for rack pull form is that the barbell should touch either side of your kneecaps when you stand next to it.
When you approach the barbell, you should use the same stance you would for your normal deadlift. If you use a conventional stance (feet shoulder-width apart), place your feet the same way. If you use a wide (sumo) stance, then go with that here as well. The same rule applies to your grip. However you would usually lift the bar when you’re deadlifting should be used with the rack pull as well.
If you’re new to this exercise, starting with a shoulder-width stance with the grip you’re most comfortable with is your best bet. If you’re not yet confident in your grip or ability to brace your core, adding lifting straps and a lifting belt can help, but don’t use them as a crutch every time you perform the movement.
The Lift
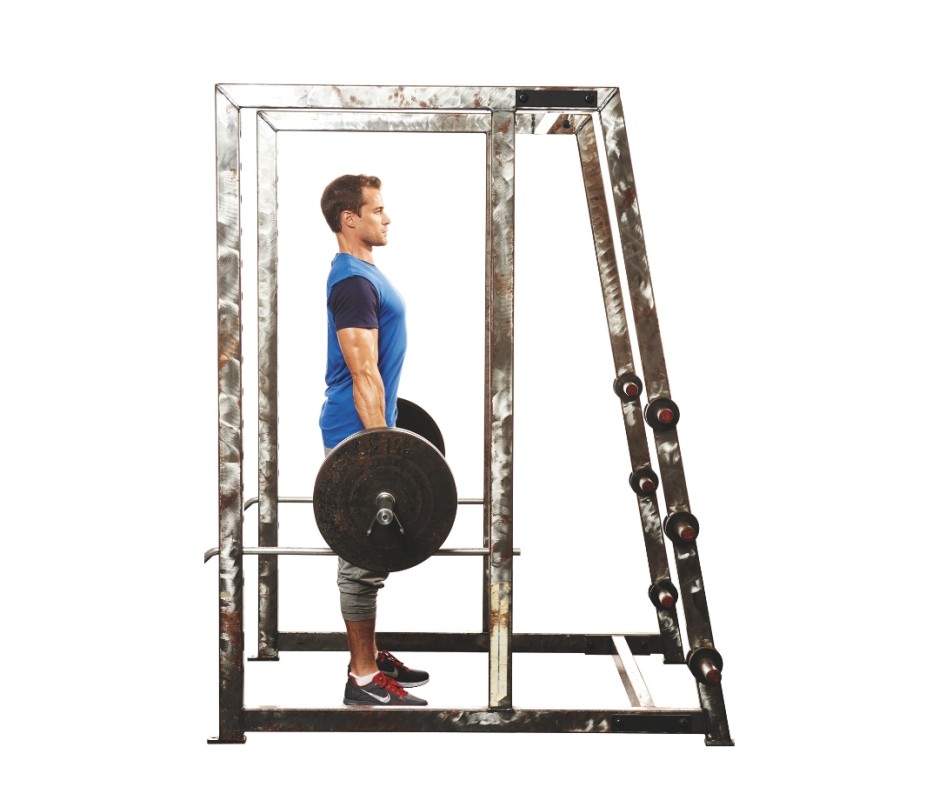
- To start, set up in a squat rack with the safety racks and barbell sitting around knee height.
- Brace your core and tighten your back, keeping it as straight as you can.
- Hinge at your hips slightly and pull the bar in close to you with your lats.
- Use as much force as you can in your grip to maintain a solid hold of the barbell.
- Drive your feet into the floor, push the hips forward, and lift the barbell off the rack and to a lockout position so you are standing tall with the barbell at arm’s length.
- Once you reach lockout and your hips are forward, hold the barbell for a moment.
- Slowly return the barbell to the rack and come to a complete stop before performing the next rep.

Getty Images/SEBASTIAN KAULITZKI/SCIENCE PHOTO LIBRARY
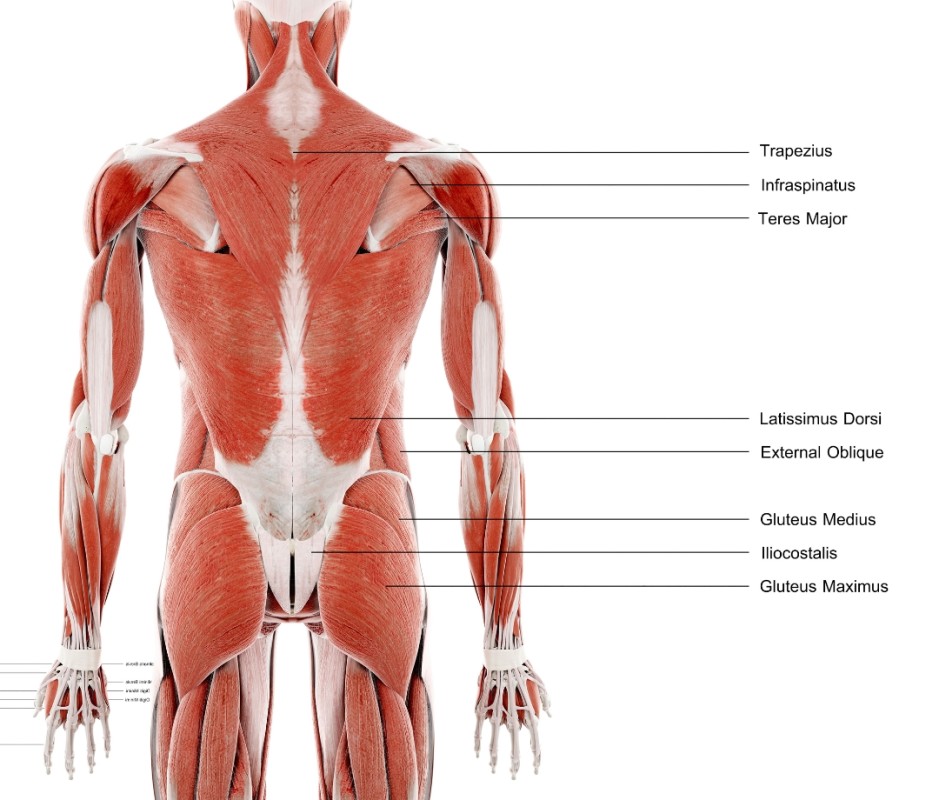
Rack Pull Muscles Worked
Lower Back
Thanks to the decreased range of motion, the lower back receives extra attention with the rack pull. While it won’t completely isolate the area, you will notice a positive change in your muscle development and strength if performed correctly. You can also focus on the muscles with less stress and toll on the vertebrae.
Glutes
The glutes are the biggest muscle group in the body, and they are heavily involved in the rack pull. If you want to maximize your glute gains try squeezing your glutes at the top of each rep. You can also use the glutes to generate the maximum force for hip extension.
Hamstrings
The range of motion you’re able to do while performing the rack pull will determine how involved the hamstrings are during the movement. If you’re lifting above the knee, then their involvement will be less than they would be if you start below the knee. Nonetheless, they’re still working at some level so you can get the barbell up to a lockout.
Related: Master the 5×5 Workout to Build Strength, Muscle, and Power
Quadriceps
You have to straighten the knees to achieve lockout, which means you need the quadriceps involved as well. Like the hamstrings, the range of motion will determine how active the quads are. Keeping your hips low will also increase their involvement.
Trapezius
Your traps are going to help you maintain back tension so you can stabilize the barbell as you pull it up. Other back muscles such as the lats, rear delts, rhomboids, and teres major will also be active, but the lats are the main movers. Because of this, a lot of lifters and trainers like to use extra weight to maximize this tension and improve upper-back strength.
Forearms (Without Straps)
Using lifting straps is fine if you want to lift more, but if you choose to use them, know there’s a good chance you could be losing out on some gains. Going with a hands-only grip allows you to improve your grip as well as strengthen the muscles in your forearms. Powerlifters, for example, are not allowed to use straps during competition, which is why many opt to leave them in the gym bag while doing this movement.
Related: The Shocking Way to Instantly Improve Your Deadlift
Common Rack Pull Mistakes
If you are new to this movement, then knowing what not to do is as important as knowing what you should do. Avoid the below errors at all costs if you want to get the most out of the rack pull.
Not Enough Weight
You will need some level of resistance to know you are doing the exercise correctly. Once you are warmed up, you can feel confident starting with a weight that is comparable to what you can already use for a full deadlift. Using weight that is too light won’t provide the benefits that the rack pull has to offer.
Going Too Heavy
The opposite applies here as well. Yes, your range of motion is shortened, but you don’t want to pack plates onto the barbell to draw attention to yourself, and then have to compromise your form to get it up. If you can’t do it correctly, then adjust the weight accordingly. You should already be able to use more weight than you can on a regular deadlift attempt so use this movement to make that lift easier before going up in weight.
Short Range of Motion
The range of motion for this exercise is already shorter than a regular deadlift. Setting the racks too high for the sake of moving more weight can actually be counterproductive, this move isn’t just an ego lift after all. You want to work the targeted muscles through some range of motion in order to achieve the desired effect.
Related: Get Shredded With Brad Pitt’s ‘Fight Club’ Workout and Diet
Going Too Fast
It may be tempting to lift fast and simply touch the rack before your next rep. However, this allows momentum and gravity to do the majority of the work, which can minimize the desired effect and possibly lead to injury. The execution should still be controlled throughout the entire rep. Stopping briefly on the rack before the next rep will negate momentum and allow you to generate your own force.
Improper Positioning
Rounding the back or placing your feet so they are uneven could also alter how the muscles are working and lead to injury. Following the guidance shared above will serve you best.
Rack Pull Alternatives
There are other variations that you can perform that will help you see similar benefits to the rack pull or even provide more results if you choose to add these to your routine. These four options can be great assets to any training program.
Axle Bar Rack Pull

James Michelfelder and Therese Sommerseth
The Axle Bar has a thicker diameter than a traditional barbell, which provides an even greater grip challenge. If you don’t have access to this type of bar, using thick grips on a traditional barbell will offer a similar benefit.
How to Do It
- To start, set the Axle Bar on the rack and load the plates you wish to use, making sure the plates and collars fit properly.
- Assume a stance similar to what you would use for a traditional rack pull.
- Make sure you have an even grip on the bar or your straps are secured before beginning the attempt.
- Perform a rack pull as you would with a traditional barbell.
Isometric Rack Pull

Getty Images/Hirurg
The isometric rack pull calls for the empty barbell to be under the safety arms and pulled up until they are against the arms. Pulling against the arms will cause an intense isometric contraction.
How to Do It
- Set the safety arms so they are at the point that you want to focus on, to start.
- Place the barbell on the floor underneath the safety arms.
- Assume a stance similar to your normal deadlift.
- Pull up until the barbell reaches the safety arms.
- Pull against the arms for three to five seconds.
- Slowly lower the barbell back to the floor, reset, and repeat.
Trap Bar Rack Pull

James Michelfelder and Therese Sommerseth
The trap bar, or hex bar, has vertical handles, which provide a more natural position for the arms. There are trap bars that will fit inside of a rack, but if you don’t have one, you can set the weight up on blocks so the weight is elevated to your desired height.
How to Do It
- To start, place the trap bar on the safety arms at your desired height.
- Stand inside the trap bar so your middle fingers are in the center of the vertical handles when you hold them. This will ensure that your grip is centered and even on both hands.
- Perform the lift as you would a traditional rack pull.
Elevated Sumo Deadlift

James Michelfelder
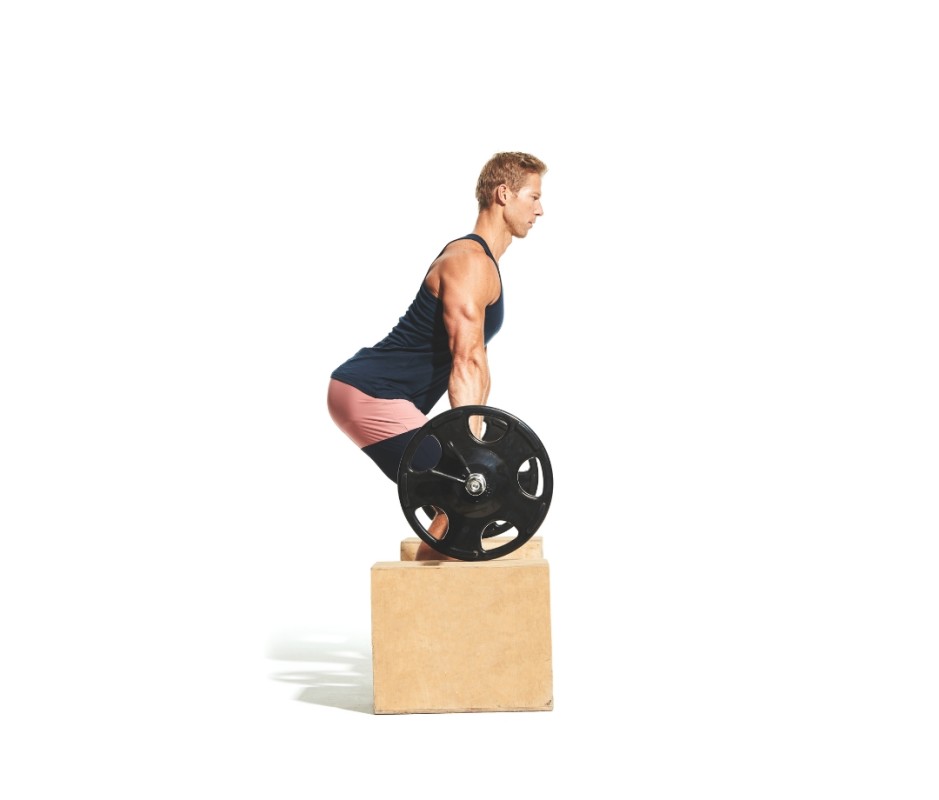
If you are a sumo deadlifter without a rack, then you can also set your weight up on blocks or steps so the barbell is where you need it to be. The weight being on the blocks will provide a different challenge since the weight is touching instead of the bar on a rack, but you will still be able to work on the lockout and work the muscles as desired.
How to Do It
- Set up your barbell in the rack or on the blocks if you don’t have a rack.
- Get behind the bar and position yourself as you would a traditional sumo deadlift. Use the same grip as well.
- Perform the rep as you would the lockout of a full sumo deadlift. The range of motion will be significantly shorter than a conventional rack pull.

